Wednesday, March 25, 2015

Sapping Season has arrived!

This year will make the 3rd year I have helped with the tapping to sapping to syrup process... OK 2nd year. The first year we lived here, Northern MN, I really hung back at the Manor to get more of a feel of how different life had become (being from the south moving WAY north). This year we started a our season earlier then the last. ( my wonderful SIL, she keeps all those stats. And she has told me, I forget..lol) Last year I went along with the process, not only to help out and be an active member to our family, but to take pictures.. and blog about the experience! This year.. same deal! Although, my husband's Uncle has been so awesome to take pictures as well! I love the extra help in documenting the whole process!

My Day 1:
3/12/2015 (Happy Birthday Aidan and belated (by 1 day) Jeremy!)

(Their day 2. Day 1 for the others included putting out about 75 taps!)

We met up at our meeting place about 10 am. There were 4 of us total and our goal was to clear a new trail! With our mission in place and a plan made we headed off into the woods!


Of course where the next trail was needing attention.. right by the river!! The Mississippi river, we were standing on the thick frozen overflow water from the river. At this point I guess I can say I walked on water, right?! lol Don't let the ice fool you, this day turned out to be perfect! Warm enough to be down to sweatshirts!

Evelyn and Aaron had previously marked off the trail and to how they wanted it done. Alan and I were there to help with labor.


While Alan provided the pressure on the small tree, Evelyn cut it down as close to the roots as she could. Once, down the tree is then cut up in to 4-5 foot pieces to be used later when its time to boil!


with in 2 hours or so we had our trail cleared and cleaned up. So we decided to go and check on some of the buckets down closer to the river. Truly a gorgeous day to be out and about.. Even our dogs and other animals in nature thought so as well! Just look...


Meet Freya, a cute fluffy girl! Yes! just beyond the grassy spot is the actual flowing Mississippi River!


Meet my crazy, Macy! She is part Husky and part German Sheppard.. needless to say, regardless of age, she will ALWAYS be a puppy in snow and ice! lol Having a great time rollin' around!


And Jack, Jack-Jack, Jackson... the oh so adorable but not so bright Dachshund! He is just SOOOOOOO cute!! (he does have 4 legs.. the ice is just cold!)


Not to mention the fresh air and the warm sunshine that brought a resident momma out for a visit:


A little hard work, some beautiful nature.. and this day we brought to an end. Well, I had to! I had a Reese's Cake to make!

Stay Tuned... there is more sapping, boiling and syrup to be had/made!

<3 T

Simply Always, Tina

48 Hours later

With the help of some others, I choose to leave a social media site temporarily. Let me tell Ya, I thought I was doing good before!! No WAY! With the lessened pressure of checking on the world around me, I got quite a bit done! I finished 2 blogs yesterday, ordered my transcripts from places to place and FINALLY wrote a scholarship essay! On top of lunch, dinner, 3 loads of laundry, therapy appointments, visiting with a friends.. And honestly I felt I STILL had time to get more done! It's amazing! Lol


Oh SURPIRSE! I am going back to school! I know.. WHAT?!?! How can I?.. Ya know, with the house, the husband, the 6 kids, the garden... The list goes on and on.. Well, here's my answer.. In order to achieve the things you so want in life you HAVE to take steps in that direction. The perfect time?! That doesn't exists! Ever! That why NOW is the right time. I have put off nursing school for, safely speaking, 12 years or more! I always felt my children needed me NOW and that was more important. Now the youngest ones are in school full time, it's time to put my big girl pants on and finish before my oldest graduates high school! So the count down begins! First step... Testing, summer courses and fall courses.. Then fingers crossed I am accepted into the 2016 nursing program and once that happens.. Fingers crossed, again, I graduate May 2017! 

More posts are coming, as I have a ton to share... It's Sapping Season here at Nordlund Mannor! This is the time of year our whole crew helps out our neighbor in his process of making Mayple Syrup! We wait all winter for this time of year! Can't wait to share our adventure...


Stay Tuned!

❤️ T

Simply Always, Tina

Tuesday, March 24, 2015

Another Reese's Cake

I call this "Another" Reese's cake.. Well cause how many variations have YOU see?! Seriously this was the most simple thing to make ever! But the looks.. Amazing! Like always when I get an idea in my head I go straight to Pinterest to see what others have done. After about a day of research and drooling ALL over the place at all the yummy Reese's ideas out there.. It was time to buy. This time I did not go all home made (next time I totally wil!) because this was new and I didn't want to worry with making the perfect cake batter and a perfect cake.. Pfffft!!! So I bought a box of chocolate cake, 1 container of chocolate frosting and 1 cream cheese frosting (I wanted peanut butter.. Well beggars can be choosers, right?!), 16 regular size Reese's cups and a big bag of mini Reese's cups! Trust me on the big bag.. Your gonna snack on it too!


The next step I took was to grease my 2 round cake pans and I even went the extra step and cut and placed parchment paper in the bottom to prevent the cake from sticking, well cause I knew what was about to happen inside that pan.. And I wasn't going to risk a broken cake! ;)

So, I made the cake from the box substituting the oil with butter and water with milk. The placing just enough batter in the bottom of my pan to start the creating:


Next, is to obviously remove Theresa of the wrapper and place the Reese's in the pan like so...


Next, take the rest of your batter and seperate it evenly (as evenly as you can) between the two pans. Make sure you completely cover the Reese's! 


Bake in the oven just as the box instruction tell you to!


Now, I allowed mine to cool on the stove top (kitchen window was open, since it was a nice "spring" like northern , MN day.. Aka 40 degrees) for about 15-20 minutes then removing them to a wire rack until completely cool to the touch.

Next the construction.. Which of course I. The moment of it, well I am just not thinking... Hmmmm, I should really take a picture of this.. Nope I just wanted to build and decorate! I took one layer and placed it on my platter. I used cream cheese frosting (again wishing it was peanut butter) to coat thickly the top of the bottom layer of cake. Then placing the top layer on top. Next, I took the chocolates frosting and went all around the out side of the cake.. Being careful not to get it on the top. I then took the cream cheese frosting and coated the top of the cake with the cream cheese frosting.. Making pretty swirls with a flat knife. I unwrapped the mini Reese's and made a nice ring all along the boarder of the cream cheese and chocolate frosting! Then placing 6 mini Reese's in the center. I then took some of the chocolate frosting and put it in a zip lock baggie, with a decorative tip pipped some chocolate in the center. The final touch I cut up, yes cut with a knife, about 6-8 mini Reese's and sprinkled around the top! And this is what I got!


And then my handsome birthday boys got to dive into this awesome cake!!

Happy 9th birthday Aidan! And Happiest Birthday to my best friend for life, my husband, Jeremy!
3/11 and 3/12! My pieces! 

Here is what I was able to snap of the cent or the cake and a slice.. Before the whole thing disappeared! Lol


Please enjoy!!! 

Go have fun with your own creativity! What would you do differently?!

❤️ T

Simply Always, Tina


Silenceville... BMB

Silenceville.... It's a round trip to Silenceville and back. What does that even mean?! It has never been a secret in my life that I have a temper. I just choose to keep tight control of it. EVERY now and then a little bit slips out, usually after I am tired of holding my tongue. They say a picture is worth a thousand words. Well, confession: I am a picture whore!! I love takings pictures and of course sharing my pictures and the beauty I see in those pictures, whether it is still life or my family and friends, every picture say a thousand words. Well there have been little birdies in my ear for about 1-2 years complaining about the pictures I post. So I changed, I started making sure I had permission before I would post.. However being human this last time.. I did not.. Well birdies started chirping again. This time, I said no more then. If my pictures on a certain social media site upset others.. Then I will take a break, step back. And I DID!! Little did I know that my wonderful family and friends would stand up for me, to them I am thankful. Although at this point I still have not looked at the social media sore spot, my husband has told me a little. You all are wonderful! But you also know me all to well! I am never silent.. The are other social media outlets.. And of course my blog! Lol so on with my next adventure... BMB.. Better My Blogging

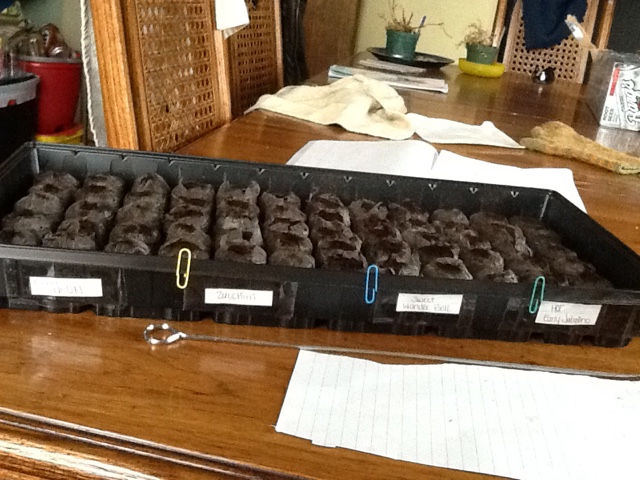
Yesterday was Monday March 23, 2015 and I put seeds in dirt! I know I had started another blog dedicated just to our garden.. But I would like to keep ME more simple right now and just keep all of my thoughts, recipes and crafts all together! Yesterday was an exciting day cause we are 6-8 weeks closer to putting plants in the ground! This year we are trying our hand at this, alone? Well, alone with a village of help! I purchased all the seeds I felt we would need in February (allowing them to ship the potatoes in April). I then started researching the particular variety of purchased and how to produce the most successfully year. On 2/25/2015 I did start onions. I read, and read... AND read.. So I started the onions when the almanac said to and from then I have been measuring. Once the plant gets 5" tall I cut it back to 3". Yesterday, 3/23/2015 I cut the first 2 onions back from 5-3! Then I planted:


I planted all the tomatoes.. Three kinds: Cherry, paste and slicing

Then planted more:


And by the end of it, with the onions added in.. I finished 5 trays of garden plants.. That's 324 plants.. Errrr mmmmm seeds in dirt! We now officially have onions, tomatoes, zucchini, patty pan squash, broccoli, cauliflower, cabbage, pumpkins, sweet peppers, hot peppers, pickling cucumbers and slicing cucumbers!! I even designed the lay out of the garden:


Lots of plotting and planning.. Now it's time to make it happen and share it all with all of you! WAIT, I think I have a cake to blog about.. How's your sweet tooth? Is it ready for a Reese's cake?! Stay tuned.. More coming.. Daily?! That would be a marked improvement! Lol


Keep creating, keep baking, keep on keepin on!

❤️ T

SimplyAlways, Tina

Monday, January 19, 2015

Strawberry lime Butter Cream Frosting

It must be the time of the year! Every year about this time I am so inspired and wanna make something new everyday.. Yeah that gets exhausting after while! Hahaha!! So after making a hit among the family and some online friends with the PLC Chicken, I had to keep going! And I LOVE LOVE LOVE to make cupcakes, I don't know exactly why.. But I do. I am not very good at the frosting part.. Just need to keep making more until I perfect this! The taste is always spot on, however I feel I can not ever get it "stiff" enough to pipe onto the cupcake itself. Sigh! I would gladly take anyone's criticism on this matter in how to make my frosting better! ;)

Ok enough about me and my thoughts lets talk dessert!!!

NO! The cupcakes were not store bought or a box mix... YES! I did make the cake from scratch following this recipe: https://www.mysanfranciscokitchen.com/homemade-vanilla-cupcakes/. Now I didn't change anything in the original recipe. BUT I did add 4 drops of lime essential oil, by Young Living. After they were baked, I then cut a circle out of the top of the cupcake removing that part of the cake. I added strawberry pie filling (YES, siiiiigh, from a can) and pushed the circle back on top of the filling like so...


I did have a person, Jeremy, test taste before the frosting... I was told it was GOOD.. Very tasty..  :) now it was time to start a new frosting recipe. I had to wait for my butter to get soft enough to cream. So, about room temp. Once the butter is soft enough beat it until light and fluffy (I personally think my kitchen is too humid to achieve fluffy, which could be overall frosting problem). 


This is where I started to cream the butter, but it was still not soft enough. So I wait a bit longer. Now I super failed in taking a picture of my creamed butter before adding other ingredients, call it mommy brain or mommy distraction! Anyways, the recipe I followed then calls for 4 1/2 cups powdered sugar, 1 1/2 teaspoons vanilla and 5 tablespoons milk. This is where I got "creative". I did put 2 teaspoons of vanilla in and about 2-4 drops of Lime oil, essential oil made by Young Living (good luck trying to get JUST 2 or 3 drops..lol) and in place of the milk (meaning I didn't add it at all) I did 5 tablespoons of the strawberry pie filling that was left after filling the cupcakes. I alternated 1 cup powdered sugar to 1 tablespoon pie filling...


On the first go round I did 1 cup sugar, all the vanilla and the oil. Then, I began the alternating of sugar to filling. I did end up putting a total of 5 cups of powdered sugar in as well to attempt to thicken it. Here is the final out come..


The original Butter Cream Forsting recipe came from: http://www.supercouponlady.com/easy-buttercream-frosting-recipe/

Strawberry lime Butter Cream:

1/2 cup butter, unsalted, softened
5 cups powdered sugar
2 teaspoons vanilla extract
2-4 drops of lime essential oil, Young Living 
5 tablespoons strawberry pie filling

Once butter is softened, beat with mixer until the butter is light and fluffy. Add the vanilla, lime oil, 1 cup of sugar and 1 tablespoon strawberry filling. Mix. Continue adding sugar and filling until you have added it all. Then frost your cake/ cupcakes/ goodies, and enjoy!!

Don't forget to leave you feedback as to how this turned out for you!!

Good luck and happy baking!!

<3  T


Friday, January 16, 2015

PLC Chicken

The PLC Chicken?!?! What's that you ask?! Peach, Lime, and Cilantro Chicken! It's my own special little take on a recipe I saw on Food Netwrok, by Ree Drummond. The original recipe is Peachy Whiskey Chicken (http://www.foodnetwork.com/recipes/ree-drummond/peach-whisky-chicken.html) which looks to die for! But like my usual self I don't have all the ingredients the recipe calls for, lol go figure! So here is what I did to give my super large family of different pallets something to enjoy!


I started off but searing, or browning just the outsides of chicken legs and thighs. I have a huge family so I bought the family size package of both legs and thighs, so I did have to cook in two batches. I put two tablespoons of lard (homemade of course) in the bottom of my roasting pan. Once it was nice and hot, I lined the chicken into the bottom of the pan letting them cook on each side for about 5-10 minutes (or until browned) on each side.


While I was cooking the chicken I diced up one medium onion as well as rolling 3 limes on the counter to "loosen" the juices. Hehehe


Once the chicken was browned on the out side (not cooked all the way, meaning the middle is still raw and not consumable) I removed all the chicken from the pan and sit aside on a plate. I then used my wooden spoon and moved around the pan the remaining juices and Lard left in the pan and scraped up some of the goodies left behind by the chicken. I then put the onions in the pan to start cooking and sweating down.


While these babies started to cook down I gathered what other ingredients I was going use in my modified version recipe. So, once the onions were translucent (or slightly see through) I then carefully poured in about 1 cup of spiced rum, the juice from two cans of peaches (YES, don't judge I was using what I had on hand, even though I had fresh peaches I froze.. Does that make then still fresh?!), the juice from 3 limes, 2 -4 tablespoons cilantro (mine were frozen pre made cubes), and allowed all of this to come to a boil. Once this wonderfull mixture came to a constant boil I even throw in the limes... I cooked all of this down (reduced) to about half of how much there was to start with. I then removed the limes and added about 4-5 cups of water.


I let the reduction meld with the water and come back to a boil then added all the chicken back.. All players into the pool! Then pouring the peaches out of the can over the top of the chicken, added the limes back in, finally covering with aluminum foil and putting all this goodness in a 359 degree oven for an hour or until the chicken pulls apart easily between two forks!


The reviews on this dish were top notch! Yes this is coming from only one adult, 2 teenagers and 3 adolescent kids! And finally convincing the last child (once I pulled all the meat, skin, and fat off the meat for him), and he LOVED it! It's a must.. If you need a must! :) 

Try and leave comment to how yours turned out!!


PLC Chicken (Peach Lime Cilantro)

1 family  package of chicken legs or thighs (or like my large fam, BOTH)
1 medium yellow onion
3 limes
2 cans of sliced peaches 
2 tablespoons lard (or oil of your choice like olive)
1 1/2 tablespoons garlic salt
3 teaspoons fresh groud pepper 
2 teaspoons of dried Oregano
2 teaspoons of dried basil
1/2 teaspoon ground ginger
1 cup spiced rum
2-4 tablespoons cilantro 
4-5 cups of water (depending on how much chicken, less for less/ more for more)

Use a Dutch oven or pan deep enough that can cook on the stove and then go in the oven. In such pan put the 2 tablespoons of lard (or oil of your choice) to heat up. While this is getting hot (over medium high heat) season you chicken with the dry ingredients (garlic salt, ground pepper, oregano, basil, and ginger). Once oil is hot place the chicken in (I like to start skin side down) and allow to cook for about 5-10 minutes (until it moves easily from the pan and is brown in color) then flip and cook the other side 5-10 minutes (until it moves easily from the pan and is brown in color). Once browness is achieved one both side remove all the chicken out of the hot tub and on to a plate to rest. Next add the chopped onions (the ones you chopped while the chicken was cooking) to the left over oil and chicken juice (sorry I don't know what to call it) and cook it til it a bit see through. While stirring the onions make sure to scrub some of the little bits of chicken goodness off the bottom of then pan. Once the onion has achieved a ghostly appearance (see through/translucent) carefully add in the rum and stir it in good. Then add in the juice from the 2 cans of peaches. Cut the limes in half (after you rolled them on the counter with pressure softening them, while the chicken was cooking), squeeze the juice right into the pan, hopefully being careful to catch any seeds that may come out (seriously mine had none, weird!), and add your cilantro. Bring to a boil, add the lime halves to the party (not the seeds just the lime itself, you washed it right?!), and reduce heat to low- medium/low stir occasionally, allowing the mixture to reduce by half. Once the reduction has occurred pour in 4-5 cups of water (depending on how much chicken. More chicken more water, less for less). Bring this back to a boil, of course stirring while waiting. Once back at a steamy boil, add all the chicken and other player to the pool. Other players?!?! Add all the chicken back in then pour the peach slices over the top and finally placing the lime halves back on top. Cover with aluminum foil and place in a 350 degree oven for about an hour, or until 2 forks can pulls the meat apart with ease, and I mean real easy! Falling of the bone goodness!


Enjoy this yummy creation!

<3  T


Saturday, December 27, 2014

Peanut Butter Cookies

So this time of year, every year due to the holidays we bake cookies. We bake a LOT of cookies. And every year I find myself searching for a good peanut butter cookie recipe. Every year I find an acceptable one but not "the one". This year with the help of one of my oldest friends (not age, years known), Andy C., I think I have fallen in love with this simple recipe! And I mean SIMPLE! But as you all have gotten to know me slightly over the last 2 years of blogging, you know I can't leave a recipe alone with out modifying it somehow. 

Ok on to the easy super simple recipe.. 3 ingredients: 1 cup peanut butter, 1 cup sugar and 1 egg! Yup that's it! I know I couldn't believe it myself how simple that is!


I have been doubling the recipe at a time, for my army of humans here, and I get about 3 dozen cookies! Just add all ingredients to the mixer and mix away! Preheat the oven to 325..


Now you know me.. I like to deviate.. So this is what I did as a trial.. I put one drop of each Young Living oil in, Cinnamon bark and Nutmeg, to give the cookies a more "chrismas-y" feel to it! Yum!


I mix the ingredients til I get a dough like texture.. Then star rolling into balls, cooking a dozen at a time for 12-15 minutes.


I do use parchment paper when baking these.. The cookies come off clean and ... Well perfect!


Right when it comes out of the oven I press the cookies down with the bottom of a glass bowl pressed in sugar first! OK, yes please!! 


Pull up a glass of milk and enjoy! My family.. Especially my "biggest" kid LOVES these cookies! Please share your baked goodness with your family, and leave me a little note as to how your turned out as well! ❤️


RECIPE:
By: Michael Clifford, Georgia

1 cup peanut butter
1 cup granulated sugar
1 large egg

Preheat oven to 325 degrees. Put all ingredients into the mixed. Mix until well blended and forms a thick dough. IF you dough is sticky spray your hands with cooking spray or use butter. Roll dough into 1/2 inch balls. Back 12-15 minutes. Press cookie down with a cup pressed in sugar. Enjoy!


Happy Baking!
<3 Tina


***UPDATE***

So, I knew in advanced I would be doing an update on this blog.... So here it is! 

For an extra special treat but some melting chocolate, make a double boiler (sauce pot with water in it, with a heat safe bowl on top) place the chocolate in to the heat safe bowl and turn the stove on medium high heat til the water below the bowl starts to boil. I use a rubber spatula to stir the chocolate as it is melting. Once all the chocolate is melted I lower the heat of the stove to low/low-medium. 


This is how mine turned out... I usually just buy the chocolate flavored almond bark.


Then all I simply do is dip the cookie in halfway and set them on parchment paper lined cooling racks! This has turned out to be the best thing yet we have dipped in chocolate!


My finished batch! The two at the very top of the picture are completely covered in chocolate... Wow! Think I may have found a homemade way to make the famous Reese's... Cause boy are they good!!

You may go enjoy now! More coming in 2015 including fruity pebble cake! Oh yeah I am going there! 

❤️❤️❤️❤️❤️❤️
<3 T