Thursday, July 10, 2014

Baked Radish Chips

Well, Happy Summer!! Took the family for a lil vacation that last about 3 1/2 weeks.. Then back home and time to tend to the garden! To my surprise we had a whole bunch of radishes!! I love them fresh, however there is no way we could eat that many before they went bad! So, I do what I do went to Pinterest in search of how to can radishes. I found Radish relish, pickled radishes and then I saw radish chips. Thought it would make for a good Pinterest attempt and blog about it! 

The website I used (from Pinterest) for this recipes: www.pinchofyum.com/cinnamon-sugar-radish-chips


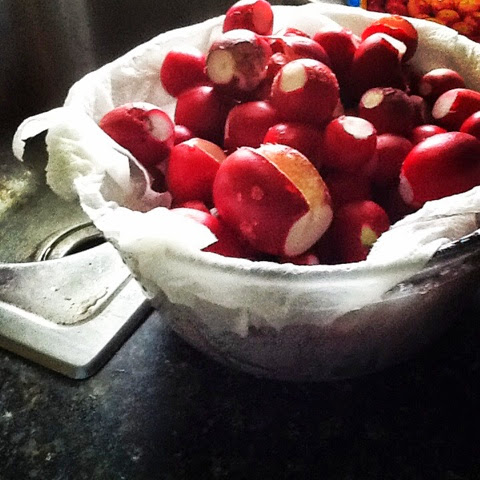
Started off by bringing in all the radishes I could gather, cut the tops and roots off, and washed them (or bathed them, depending how you look at it) in cold water and 1 cup of white vinegar in a large bowl...


They just cleaned up so well!! And look delish!!! Next...


So this is where I lack the "chef" skills!! Trying to cut them all about the same thickness.. Oh yeah, need to invest in a mandolin soon! (Future check list).. I cut enough for what I will say is about 3 cups maybe more... :D


Next, I started to make the "wet" mixture. 1 tbsp olive oil, 1/2 tbsp raw honey, and 2 tsb of sugar/cinnamon mix.. I whisked together till it all combined into a pretty honey mix..


I did heat the radishes in the microwave for about 30 seconds to warm them up. I poured the liquid gold over the radishes and did my best to stir it all together...


Since I am who I am.. I didnt have parchment paper (could be why they messed up) so I coated the sheet with shortening (which may have been mistake number 2).  I then cooked the chips for 15 minutes, flipped them and put them back in the 350 degree oven for 20 more minutes.. Then another 10 or so.. Sadly they never became crispy.. Just chewy...


Safe for me to say that this attempt was an absolute fail!... But I will get the proper paper to line the pan with or buy one of those mats made to bake sticky stuff.. What are those things called?!?!... 

Until next time, I hope you enjoy your summer as much as we are here so far.. Off to the garden for the next adventure!!

 <3 T

No Bake Granola Bars

Well this seems to be the latest trend! Everytime I go looking for a good chewy granola recipe.. I get 1000's of no bake recipes! So, I finally broke down, gave in and decided to give it a try.. In the past however with no bale recipes, like rice crispy treats, I some how always have an issue! Let's get this granola party started!

I did what I always do, went to Pinterest in search of a good granola recipes.. After reading a few I finally "pinned" it down to: www.savingwithshellie.com/bake-peanut-butter-granola-bars/

This recipe had only 7 ingredients... One of which was flax, which I do not have so I added an extra 1/2 cup rice cereal (per the recipe). I also added about 1/2 cup each cashews and raisins.. Could be an issue.. Might make it better... An hour will tell!


I started with the dry ingredients: 1 cup rice cereal, 2 cups oats, 1/2 cup cashews... Tossed a bit with a wooden spoon...


Next, I added all the "wet" ingredients.. 1/4 cup white sugar (cause like always, I always fudge an ingredient! This time no brown sugar (which did you know is just white sugar and molasses?) so I subbed), 1/2 cup raw honey, 3/4 cup peanut butter (creamy, is what I had on hand) and 1 tsp (the recipe calls for 1/2 tsp) home vanilla raspberry extract :)...

I took the "wet" ingredients and heated them in the microwave (as the recipe called for) for 30 seconds at a time, stirring between each till they were well combined and not too hot (this step is where I think I messed up)..


Next, I poured the warm, well mixed wet ingredients over the top of the dry ingredients. I combined the best I could using the wooden spoon. I then poured it in to the pan I had lined with wax paper (yes, the recipe calls for aluminum foil) mixed a little more by hand.. The mix just seemed too dry like it would crumble even after it sits for an hour in the fridge...


The final look before going in the fridge! All mushed down the best I could.. Fingers crossed for the outcome...


Out of the pan and already I can see that there wasn't enough liquid.. Sigh the taste was great! Maybe add more peanut butter and honey to cover the cashews and raisin!! Must try again!!


Yumminess! Enjoy!

 <3 T

Tuesday, May 6, 2014

Homemade laundry detergent

I start a new adventure here at the Pin There, Tired That blog!! This blog was started to try different Pinterest things and see whether they pass or fail... I have drooling over the ides of making my own homemade laundry soap. I have read SEVERAL blogs, and finally found one to follow (One good thing By: Jillee. http://www.onegoodthingbyjillee.com/2011/08/homemade-laundry-soap-revisited.html). I got up the nerve to go and purchase the items needed for making this item. All I purchased was 1 box of Borax (cost $3.97, at my local Walmart), 1 box of Arm & Hammer Washing Soda ($3.24 at my local Walmart), and lastly a 2 pack of Dial gold soap ($0.97 again at my local Walmart). 


To start with I took 1 bar of Dial soap and grated it with my old grater (personally donated, by me, to the soap cause) and then....


Put in 8 cups of hot water and stirred to mix. Put the burner on LOW to help the soap along and dissolve in the water...


Once all the soap has dissolved into the water the next step is to add in 1 cup each of Borax and Washing soda...


As you can see it gets foamy... Or at least mine did after adding the "dry" ingredients... And once the mix started boiling it really gets foamy!!... I removed from the heat as soon as the boil got rolling.. AKA almost foaming over. I let it cool for about 5 minutes.. Then laddle by laddle, through the funnel I tried to divide the mix equally between 2 gallon containers...


The before: ^ adding of water....


The after.. ^ Now time to test in the laundry :)

 After letting my stuff sit for about thirty minutes, and not using it YET..mine became "chunky", I believe it is the foam that was on top that became solid and mixed in. If so then the next time I will scoop the foam off (lessons learned) .. Now its time to put it to the test and run a load of clothes to try it out... But first, I am adding 10 drops of lavender oil in... 


 Load of bed sheets are washing away, smell test later.. Look for the PS...

<3 Tina

P.S. Although my detergent continued to stay lumpy it did seperate too! I still find my clothes just as clean if not cleaner and the smell is way better then store bought detergent. I just shake my mix up before each use. Using the "measuring" lid from an old detergent container, I use the same amount in my same size loads! Maybe next time I will stir more consistantly to avoid lumps?! Hope you try this yourself. IF you do please leave a comment to how yours turned out!

Saturday, January 18, 2014

Homemade Potato Gnocchi!

So what do you do when you have a billion potatoes.. Make pounds and pounds of gnocchi!

In the joy of cooking cookbook, my wonderful sister in law found a recipe for gnocchi that Cousin Shana was wanting to learn to make. The first step is to bake 2 pounds of potatoes (in our case 15 pounds!!!). The wonderful hubby and and sister in law scrapped all the potatoe out of the skin. Carefully measuring out 2 2/3 cups of cooked potato, which we did mash before adding in 1 1/3 cup all purpose flour, 1 teaspoon salt and 1/4 teaspoon nutmeg.


Next, after adjusting the amount of flour to make it the "right" consistency (kind of like playdoh, or a slightly crumbly dough). Flour your work area and grab a handful. Start to roll it out in to a log. 


You want to use a butter knife and try to cut it in to equal parts. Here you see, BIL, Jake uses the side of a fork.. You get the same result and dirty less dishes.. Right?!?!


Now, holding the fork flat to the cut piece, roll it slightly to slightly flatten and "score" the dough.


This is a sample of how some of ours turned out...


Now for the fun part.... Cooking the dough...


You want to cook the gnocchi floats in the water.. Then it's done!


Floating for 20 seconds.. Out to my plate and add a sauce! Yummy!

Recipe from the joy of cooking book:

Potato Gnocchi

2 pounds baking potatoes, cooked, scooped out, pushed through a ricer or sieve with the back of a spoon and divided into 2 2/3 cups
1 1/3 cups all purpose flour
1 teaspoon salt
1/4 teaspoon nutmeg

Combine all ingredients in a bowl. Stir together vigorously, then turn out onto a work surface and knead until smooth and blended. Roll into a log about 3/4 inch wide, cut into pieces 3/4 inch long. Roll each piece against the tines of a fork while pressing a small dent into the opposite side with your finger.

To cook:
Bring salted water to a boil. Drop gnocchi into simmering water until they float, about 2 minutes. They should hold a firm shape and be chewy to the bite.

Now, for use we are freezing our for future meals... You know since we had a harvest of some houndreds of potatoes. However, we will hold out enough to have some made with homemade spaghetti sauce, tomorrow. Pictures will be updates.... Well tomorrow :)

<3 T

Wednesday, January 15, 2014

Muffin-polooza

We'll hey there fancy meeting you here again!!! Yes, it has been SEVERAL months since a post has been posted :) Emma and I are back in the kitchen and this time we have a brand new tool! An iPad 2 which should make blogging easier! Woohoo!! So this weekend is our monthly family weekend! So, for Sunday brunch Em and I are making muffins.. All sorts of muffins!! To start with we are making the pin "tha standard muffin" found here: http://thewholesomedish.com/standard-muffin-recipe/ . Since this recipe gives you an opportunity to be extra creative we are making blueberry and peach! 

Here we start with the dry ingredients:


We are doubling the original recipe. Next, we added all the wet ingredients (and the sugar into a separate bowl to whisk together:

Next, add the wet to the dry and mix... Now the original cooknesta said it will be lumpy and not to over mix.. This we shall do :)


And this is where the fun starts!!! Time to fill cups!

We decided to start with blueberry... After washing her hands really well, my awesome helper started topping!

In the oven these babies go for 20 minutes!

Out of the oven and on to my plater!!!


Now once my taste-tester has had lunch, she said these are "ummmmm!!! Good!!!"


Now, I did try the peach one and Em the blueberry. We both seemed to like it! Personally I wouldn't mind seeing a glaze drizzled over the top! So we will call this one a success! <3


We like this tried pin! Now, try it for yourself! Let us know how yours turn out, as well as what creative favors you used!

<3 T


Wednesday, May 8, 2013

Peach Cobbler.. Way easy!

We have finally been able to enjoy the "spring" weather, now that it's so close to summer (less the 6 weeks away). And with all of this amazing sun shine, rainbows, nature's sounds and amazing cloud work... I make you want to bake pies and place them in the window, so as the kids are playing out side they can smell sweet pie! Oh, the dreams those wonderful cartoons gave us as kids on Sunday morning! :)


Now, for the dessert... I grabbed a can of peach halves from the pantry (big 'ol can) and sliced them up. While slicing, I had a sauce pot on the stove with about 3 tbsp of butterscotch caramel ice cream topping and 1/4 cup of coconut water wait for it to boil.


 Once this married and boiled I added in some of the peach juice from the can, mixed well with the caramel sauce then added in the peach slices.


While all of this was simmering and making happiness.. I took 1 stick of butter and melted it in a 350° oven in a square 9x9 baking dish. I then worked on the batter for the cobbler. I added all the dry batter ingredients. then slowly added in the milk. Of course, I was out of vanilla extract so, I use the same amount of almond extract. Once this was well combined and no lumps I pour this into the melted butter in the pan. DO NOT STIR or MIX these two together.. you want it to look like this:

 Next, you want to spoon in the peaches and sauce on top of the mixture.. AGAIN: do NOT stir or mix these together.. looking like this:


Last, Place this amazing smelling sweet dish into your 350° oven for about 45-55 minutes or until the crust browns and looks some what like this..lol :


And in our house when you have a bazillion kids you get topping choices!!


Strawberry ice cream and whipped cream! soooo GOOD!!


The Recipe:

Peaches
1 1/2 to 2 lbs fresh peaches (about 3 or 4 large peaches), peeled, pitted and sliced, to equal 3 to 4 cups.
3/4 cup dark brown sugar (I also made one mixing dark and light brown sugar – 6 tablespoons of each – equally good)
1/4 cup (4 tablespoons) butter
1/2 cup water
Batter
1 stick of butter, melted in the baking dish
1 cup flour
1-1/2 teaspoons baking powder
1/2 teaspoon salt
1/2 cup sugar
1 cup milk  (if you want a thicker crust, use only 1/2 cup milk)
1/2 teaspoon pure vanilla extract
DIRECTIONS:1. Combine the 3/4 cup brown sugar, water and butter  in a saucepan and mix well. Bring to a boil and simmer until sugar is dissolved.  Stir in sliced peaches, and simmer for 5 minutes.  Turn off the heat and let sit while you prepare the batter.  Place the stick of butter on the bottom of your baking dish and let it melt  in a 350 F oven.  Leave the oven at 350 while you make the batter.
2.For the batter. In a bowl..mix the 1/2 cup sugar, flour, baking powder and salt together.  Slowly pour in the milk, stirring, to prevent clumps, until smooth. Pour mixture over melted butter. Do not stir. Carefully spoon all the peaches and syrup on top of the batter.  Do not mix or stir anything.  You want three separate layers; 1. melted butter, 2. batter, 3. fruit in syrup.
3.  Place the baking dish on the middle rack in the oven and bake for 40-50 minutes.  The batter will rise to the top and it’s done when its golden brown. Serve warm with ice cream, yogurt, creme fraiche and/or whipped cream.

The Site:

Now, go be creative.. see where your senses take you.. Mine took me here with a mix of Roast Beef Pot Pie.. Tell us here in the comment's section where you imagination lead you!

<3 T

Roast Beef Pot Pie

I know, I know.. It's finally spring, But I couldn't help myself. A roast sounded good and when we had leftovers, Pot Pie sounded better! My only dilemma with this was, what do I use for a crust. I thought about a pie type crust super flaky. Then I thought about maybe using a pie crust on the bottom and biscuits on top. Then it hit me.. ummmm... Biscuits!! So, I wanted to make the entire crust out of biscuits. The search began to find a super simple biscuit recipe that included the ingredients I had.... Leading me too:

Flaky Buttermilk Biscuits!

You guessed right.. It's was the one recipe easy to follow (the wording on the directions that is) and I had juuust about all the ingredients.. Buttermilk, was missing it. But since I wanted to make this a savory biscuit, I did not want to put honey in it so what I changed was I used 1 whole cup of milk and added 1 tablespoon of vinegar (white).

All the dry ingredients.. Now I must stop here to say this.. I greatly apologize for the amount of pictures and the quality..lol my camera, aka my new best friend, well the batteries are DEAD! I just have to go to the store and get some.. but that won't stop me spunk or need to share :)

Ok then I mixed the milk and vinegar together the slowly added it to the flour mix. After adding all the milk the dough was VERY sticky.. so I added a little bit of flour at a time until I could maneuver the dough with my hands with out being coated in doughy goo... ha ha! Then I took about 1/4 - 1/3 of the dough and set it a side. I rolled out the biggest portion of the dough into the best square I could then placed it in the bottom of my baking dish. NOTE: I did not spray the bottom of my pan before placing the dough in.. DO NOT DO THIS!! grease the bottom of you baking dish before adding the dough...


I now have my bottom crust done and my top rolled out and waiting. I took my left over roast and what juice the kids saved when putting dinner away (Love leftovers). I poured the juice into the bottom of a pot on the stove. Once it began to boil I added about 2 tbsp of flour til it was thick. Then added the meat which I had cut up into bite size pieces (sizes may very depending on the mouth that's cutting it..ha!). I had some leftover California medley veg (broccoli, cauliflower and carrots) and some frozen mixed veg (pea, corn, green beans and carrots)..


I did place this into the fridge to cool off. I was not sure what to do at this point, so I figured it was better to place cool/warm meat mix into a semi cool biscuit dough.. My mind said that made since.. hehehe! Whilst this wonderful creation that was marrying nicely in the fridge, I decided a dessert was a must! Peach Cobbler went into the works! NOTE: Epic fail on my end! I did not take a picture of the final put together Pot Pie! :(

Once the pie filling, I felt, was cool enough I spooned it into the dish. Next I took the top of the pie and placed it as squarely as I could and "rolled" and pinched the sides together. I then set it back in the fridge until my cobbler was completely done. I cooks this at 375° for about 35-45 minutes. Served way hot..lol

I will say the kids had seconds and really enjoyed it. Very hearty way to use up a few leftovers!


Recipe:
Roast Beef Pot Pie:
Biscuit Dough found here: http://www.myrecipes.com/recipe/flaky-buttermilk-biscuits-10000001853981/

Filling:
1 1/2 cups cut roast beef
1/4 cup (maybe less) broth from roast, or beef broth
2 cups of pre-cooked or frozen veg
2 tbsp flour

Roll out about 3/4 of your biscuit dough and place in the bottom of you greased baking dish. I used a square 8x8 dish. Pour your broth int a pot over medium heat. Once it boils add in flour a little at a time to just thicken the broth. once thick add in meat and cook for a few minutes. Last add in your veg. Let simmer until it looks like a very thick beef stew. Remove from heat, allow to cool. Was cool or hardly warm, add to the bottom crust. Take the rest of the dough and roll it out (this can be done while the filling is simmering or cooling) into a square and place over the top and roll and/or crimp the edges together. Cook in a 375° oven for 35-45 minutes or until the biscuit dough is cooked all the way through. Serve warm.

Try it for your self.. Like it, leave a comment... Don't like it, leave a comment.. Suggestions?!?! Leave a comment! :)

Go create your world!
<3 T