Wednesday, May 8, 2013

Peach Cobbler.. Way easy!

We have finally been able to enjoy the "spring" weather, now that it's so close to summer (less the 6 weeks away). And with all of this amazing sun shine, rainbows, nature's sounds and amazing cloud work... I make you want to bake pies and place them in the window, so as the kids are playing out side they can smell sweet pie! Oh, the dreams those wonderful cartoons gave us as kids on Sunday morning! :)


Now, for the dessert... I grabbed a can of peach halves from the pantry (big 'ol can) and sliced them up. While slicing, I had a sauce pot on the stove with about 3 tbsp of butterscotch caramel ice cream topping and 1/4 cup of coconut water wait for it to boil.


 Once this married and boiled I added in some of the peach juice from the can, mixed well with the caramel sauce then added in the peach slices.


While all of this was simmering and making happiness.. I took 1 stick of butter and melted it in a 350° oven in a square 9x9 baking dish. I then worked on the batter for the cobbler. I added all the dry batter ingredients. then slowly added in the milk. Of course, I was out of vanilla extract so, I use the same amount of almond extract. Once this was well combined and no lumps I pour this into the melted butter in the pan. DO NOT STIR or MIX these two together.. you want it to look like this:

 Next, you want to spoon in the peaches and sauce on top of the mixture.. AGAIN: do NOT stir or mix these together.. looking like this:


Last, Place this amazing smelling sweet dish into your 350° oven for about 45-55 minutes or until the crust browns and looks some what like this..lol :


And in our house when you have a bazillion kids you get topping choices!!


Strawberry ice cream and whipped cream! soooo GOOD!!


The Recipe:

Peaches
1 1/2 to 2 lbs fresh peaches (about 3 or 4 large peaches), peeled, pitted and sliced, to equal 3 to 4 cups.
3/4 cup dark brown sugar (I also made one mixing dark and light brown sugar – 6 tablespoons of each – equally good)
1/4 cup (4 tablespoons) butter
1/2 cup water
Batter
1 stick of butter, melted in the baking dish
1 cup flour
1-1/2 teaspoons baking powder
1/2 teaspoon salt
1/2 cup sugar
1 cup milk  (if you want a thicker crust, use only 1/2 cup milk)
1/2 teaspoon pure vanilla extract
DIRECTIONS:1. Combine the 3/4 cup brown sugar, water and butter  in a saucepan and mix well. Bring to a boil and simmer until sugar is dissolved.  Stir in sliced peaches, and simmer for 5 minutes.  Turn off the heat and let sit while you prepare the batter.  Place the stick of butter on the bottom of your baking dish and let it melt  in a 350 F oven.  Leave the oven at 350 while you make the batter.
2.For the batter. In a bowl..mix the 1/2 cup sugar, flour, baking powder and salt together.  Slowly pour in the milk, stirring, to prevent clumps, until smooth. Pour mixture over melted butter. Do not stir. Carefully spoon all the peaches and syrup on top of the batter.  Do not mix or stir anything.  You want three separate layers; 1. melted butter, 2. batter, 3. fruit in syrup.
3.  Place the baking dish on the middle rack in the oven and bake for 40-50 minutes.  The batter will rise to the top and it’s done when its golden brown. Serve warm with ice cream, yogurt, creme fraiche and/or whipped cream.

The Site:

Now, go be creative.. see where your senses take you.. Mine took me here with a mix of Roast Beef Pot Pie.. Tell us here in the comment's section where you imagination lead you!

<3 T

Roast Beef Pot Pie

I know, I know.. It's finally spring, But I couldn't help myself. A roast sounded good and when we had leftovers, Pot Pie sounded better! My only dilemma with this was, what do I use for a crust. I thought about a pie type crust super flaky. Then I thought about maybe using a pie crust on the bottom and biscuits on top. Then it hit me.. ummmm... Biscuits!! So, I wanted to make the entire crust out of biscuits. The search began to find a super simple biscuit recipe that included the ingredients I had.... Leading me too:

Flaky Buttermilk Biscuits!

You guessed right.. It's was the one recipe easy to follow (the wording on the directions that is) and I had juuust about all the ingredients.. Buttermilk, was missing it. But since I wanted to make this a savory biscuit, I did not want to put honey in it so what I changed was I used 1 whole cup of milk and added 1 tablespoon of vinegar (white).

All the dry ingredients.. Now I must stop here to say this.. I greatly apologize for the amount of pictures and the quality..lol my camera, aka my new best friend, well the batteries are DEAD! I just have to go to the store and get some.. but that won't stop me spunk or need to share :)

Ok then I mixed the milk and vinegar together the slowly added it to the flour mix. After adding all the milk the dough was VERY sticky.. so I added a little bit of flour at a time until I could maneuver the dough with my hands with out being coated in doughy goo... ha ha! Then I took about 1/4 - 1/3 of the dough and set it a side. I rolled out the biggest portion of the dough into the best square I could then placed it in the bottom of my baking dish. NOTE: I did not spray the bottom of my pan before placing the dough in.. DO NOT DO THIS!! grease the bottom of you baking dish before adding the dough...


I now have my bottom crust done and my top rolled out and waiting. I took my left over roast and what juice the kids saved when putting dinner away (Love leftovers). I poured the juice into the bottom of a pot on the stove. Once it began to boil I added about 2 tbsp of flour til it was thick. Then added the meat which I had cut up into bite size pieces (sizes may very depending on the mouth that's cutting it..ha!). I had some leftover California medley veg (broccoli, cauliflower and carrots) and some frozen mixed veg (pea, corn, green beans and carrots)..


I did place this into the fridge to cool off. I was not sure what to do at this point, so I figured it was better to place cool/warm meat mix into a semi cool biscuit dough.. My mind said that made since.. hehehe! Whilst this wonderful creation that was marrying nicely in the fridge, I decided a dessert was a must! Peach Cobbler went into the works! NOTE: Epic fail on my end! I did not take a picture of the final put together Pot Pie! :(

Once the pie filling, I felt, was cool enough I spooned it into the dish. Next I took the top of the pie and placed it as squarely as I could and "rolled" and pinched the sides together. I then set it back in the fridge until my cobbler was completely done. I cooks this at 375° for about 35-45 minutes. Served way hot..lol

I will say the kids had seconds and really enjoyed it. Very hearty way to use up a few leftovers!


Recipe:
Roast Beef Pot Pie:
Biscuit Dough found here: http://www.myrecipes.com/recipe/flaky-buttermilk-biscuits-10000001853981/

Filling:
1 1/2 cups cut roast beef
1/4 cup (maybe less) broth from roast, or beef broth
2 cups of pre-cooked or frozen veg
2 tbsp flour

Roll out about 3/4 of your biscuit dough and place in the bottom of you greased baking dish. I used a square 8x8 dish. Pour your broth int a pot over medium heat. Once it boils add in flour a little at a time to just thicken the broth. once thick add in meat and cook for a few minutes. Last add in your veg. Let simmer until it looks like a very thick beef stew. Remove from heat, allow to cool. Was cool or hardly warm, add to the bottom crust. Take the rest of the dough and roll it out (this can be done while the filling is simmering or cooling) into a square and place over the top and roll and/or crimp the edges together. Cook in a 375° oven for 35-45 minutes or until the biscuit dough is cooked all the way through. Serve warm.

Try it for your self.. Like it, leave a comment... Don't like it, leave a comment.. Suggestions?!?! Leave a comment! :)

Go create your world!
<3 T


Tuesday, April 30, 2013

Stuffed Bell Peppers

I wish I had some amazing tale to tell with this recipe, unfortunately there is not.. Just a normal family wanting normal food.. ha ha yeah right normal!! Well, I had a taste for stuffed peppers and Jeremy said it was one of his favorite meals.

Confession: Mom has always made them and I have had them other place but make them myself.. nope not this girl. So, I went based on the theory that this was basically meat loaf in a pepper.

Here goes my attempt....


Starting with 2 pounds of ground beef, big family here.. its an easy recipe so the amounts can be adjusted.. about 1 tsp of dried Oregano, Parsley and Basil, 1/2 tsp paprika, 1 tsp of salt and pepper.


OK, normally you would add in an egg, well like always I am continuously out of something... I used about 1/4ish of a cup of olive oil and 1/2 cup of Italian seasoned bread crumbs. Mixed together with my fingers (more like squished) the chopped up about 1/4 of a large yellow onion. Again mixed well...


Getting creative and stuff I took 4 Roma tomatoes sliced them up.. place one in the bottom of all the pepper (7 for my family)...


Next, scoop in your meat mix, filling it just shy of half way. Place another tomato slice on the meat mix then fill the rest up with meat mix...


Lastly, place one last slice of tomato on top of the last layer of meat mix, sprinkle mozzarella cheese and BACON bits on top! I know can't pass up an opportunity to add bacon to something :)


Hopefully you thought a head and pre heated your oven to 350°, once your oven is at temp place your fabulous peppers in the oven for 35-45 minutes.. until the meat in the middle is cooked and the peppers are of a "darker" green and wrinkly :) I just love my cooking terminology!

Ok, recipe time.. try and put this in to the "right" form.. he he

Recipe:
2lbs Ground Beef
1 Tsp Dried Oregano
1 Tsp Dried Parsley
1 Tsp Dried Basil
1/2 Tsp Paprika
1 Tsp Salt
1 Tsp Pepper
1/4 cup Olive Oil
1/2 cup Italian Bread crumbs
7 Bell Pepper, top cut off and center cleaned out
4 Roma tomatoes
1/2 cup Mozzarella Cheese
2 Tbsp Bacon bits

Pre-heat oven to 350°Mix the meat, seasonings, olive oil and bread crumbs together very well. Tip: use your clean hand. In each pepper place a slice of tomato add in meat mix til you have reached half way up the pepper (amount will vary depending on the size of the pepper).  Place another tomato on top of the meat mix. Add more meat mix until it is barely to the top of the pepper. Lastly, place one last slice of tomato on top, sprinkle the cheese and bacon bits on each pepper. Place in pre-heated oven for about 35-45 minute (time may vary depending on the oven). Enjoy! :)

I hope you like this as much as my very picky eaters did!! No they didn't go back for seconds but at least the 6,5 and 4 yr olds each tried, and 2 of them really liked it!


Now its your turn get in your kitchen and create..

<3 T

Saturday, April 20, 2013

Oatmeal Chocolate Chip Cookies, with banana

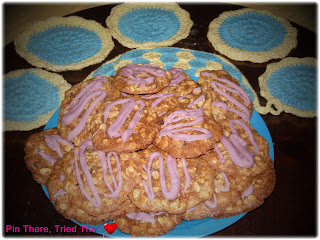
I got a bit "off" the other day and just had the will to bake but lacked creativity... So what does any blogger do.. I suppose :) I polled my Facebook page as to what they would like to see. The final verdict, after taking and combining several suggestions (sorry Dad, but I just couldn't do the Christmas shaped), Oatmeal Chocolate Chips cookies with purple chocolate drizzle.. Crazy right?!?! I love my Facebook fans <3

First thing I suppose I should apologize, dealing with the 5 wonderful kiddos in and out of the kitchen asking 1 million and 1 questions and such.... I failed to take a lot of pictures.. SORRY :(... On to the adventure in Nordlund's Yumminess Lab...

Our adventure starts off (that day anyways) with beautiful Spring day.. RIGHT?!?!

 4 inches of snow (followed by 12-14 inches over the next day) was one way to be inspired to bake.. :)

I went to Pinterest, as usual, to find a pretty easy oatmeal cookie recipe the I could tweak. Found one, however realizing this after I wanted to bake.. I found I had NO butter.. sigh to Google I went to find a substitute: Banana. So with the one stick of butter I mustard up I substituted the other stick of butter with 1 banana. 1 banana = 1 stick of butter. The hubs says healthy eating I say butter alternative stumbling upon healthiness :)

I throw the batter together following the recipe to the letter (except for that butter issue)...


I began the cookie making process, the first 10 cookies I may have been a little heavy hand with the spooning of the batter using about a tablespoon of batter per cookie, the rest I slimmed it back some to about a teaspoon size...


While the yummy cookies were baking I used a double boiler system to melt white almond bark (aka white chocolate in my book..lol) and added 1/4 cup of milk to thin it out some, 2 drops of blue food coloring and 4 drops of red food coloring to get purple!


As the cookies cooled I drizzled the the purple mix over them to give a nice look and added flavor to the cookie :)


Then I got really adventurous and thought hmmm... use all banana no butter and make oatmeal bars for a hearty breakfast treat... Oh what a great choice!!!


The recipe:

Oatmeal Chocolate Chip Cookies

1 cup butter, softened
1 ½ cups light brown sugar, packed
½ cup granulated sugar
2 eggs
1 tsp. vanilla extract
1 ¾ cups flour
1 tsp. baking soda
½ tsp. salt
1 tsp. cinnamon
¼ tsp. nutmeg
3 cups rolled oats
1 cup chocolate chips
Preheat oven to 375°.
In a large bowl beat butter, brown sugar, granulated sugar, eggs and vanilla with a hand held mixer until well blended. In a medium bowl combine flour, baking soda, salt, cinnamon and nutmeg. Add dry ingredients to butter mixture, stirring until just combined.
Fold in rolled oats and chocolate chips. Drop dough by rounded tablespoons about 2 inches apart onto a cookie sheet.
Bake for 8-10 minutes or until edges are lightly browned. Cool 2 minutes and remove to wire rack to cool completely.
The site:
Now, go off and try it too!! Oh so good you won't regret it!
<3  T

Monday, April 15, 2013

Salt and Lime Guacamole.. Ole!

We had a fun fun weekend with the family over!! Lots of time spent tromping through the woods collecting sap and even sitting in the sugar shack boiling the sap down.. all while it was snowing outside on and off, more on then off :). A beautiful way to bring in the spring! So, I did stay back a few times.. ok most of the time due to the little ones and my stupid toes being cold.. Northern Minnesota what are you going to do.. ha ha! I made treats for the troops! I made Cookie Pie with all the right ingredients including the M&M's.. salsa (which I will not post that recipe until I have all the FRESH ingredients.. I used canned tomatoes..sigh) and guacamole!

Whilst napping had commenced and the oldest 6 kiddos were out sapping with 5 adults.. I did my thing in the kitchen. starting with juicing 1 1/2 limes:

Next, I chopped up fresh cilantro and chive, from my window herb garden :) Now, the amount use can be up to you, I used, chopped, lets say about a tsp of cilantro and a 1/2 tsp of chive..

Next, I added about (since i always forget to measure!) 1/2 tsp of pepper, 1/2 tsp of salt (which I added a whole tsp of salt later, Salt is definitely to the individual taste buds!) and a tsp (give or take) of our homemade horseradish..

I had a fresh tomato left over from when the hubbs made burgers for the kiddos.. I diced up the whole tomato, reserving about 1/3 of the tomato and chopping if smaller to add in later. I diced up about 1/2 to 2/3 of a medium yellow onion...

Notice I am stirring each addition with a fork to help all the ingredients to marry nicely with each other. So my next step was to cut, pit and dice the avocado up. Of course I bought 3 fresh avocados to which 1 of the 3 was still a bit "green".. it funny to call a green fruit/veg "green" when it is not quite ripe enough.. he he. Once, the avocado is dice I place ALL the ingredients in to my food processor and pressed go..

One the mix got to the texture that I think it good for guac, (which for me is just before pureed, still has some little lumps) I poured it into a bowl. Remember the reserve tomatoes.. insert now!!

Looks, good right?!?!? Ok stir the tomatoes in, put the guac in a container let sit in the fridge and get happy, for me this was like 4 hours before the crew got back to try a snack while waiting on dinner. Spoon some in a bowl, or tea cup like me and my awesome serving dishes, serve with tortilla chips.. and ENJOY!!

Alright lets see if I can type up a recipe for you *wink, wink*

The Recipe:
3 Ripe avocados
1 vine ripe tomato, diced
1/2 medium yellow onion, diced
juice of 1 1/2 limes
1/2 tsp of pepper
1 1/2 tsp salt (depending on your pallet)
1 tsp horseradish
1 tsp fresh cilantro
1/2 tsp fresh chive

Starting with the lime juice add in the pepper, salt, horseradish, cilantro and chive. Stir together with a fork. Once well combined added in your tomato (reserving out 1/3) and onion, stir with the fork. Once combined, again, add in the avocado and pour in to the food processor. Process together until you get the consistency of almost baby food (nice description right?!?!) or the texture you desire. Pour from processor into another container, stir in the remaining tomato, cover and chill in fridge til your ready to eat! Enjoy!

Now, its your turn again.. go get in your kitchen and see what your wonderful mind creates!

<3 T

Wednesday, April 10, 2013

Cookie Pie

I asked my youngest 2 children what they wanted to make for dessert today.. Of course I get the "i don't know" kinda answer.. :) so to Pinterest we went.. Pictures do wonders with younger kids when looking for what to make! We found a picture of M&M Cookie Pie and it was agreed that is what we would attempt to make. I perused the ingredient list and found that I did not have brown sugar, and of course did not feel like trekking to town to buy some either so I googled for what I could use for a supplement. And low and behold (lesson for the day) brown sugar is nothing more then white sugar and molasses. I read that I could equally substitute white sugar for brown. so I did :)

We waited for the butter to come to room temperature, which allowed time for the 3 oldest to make their way home from school. I now had 3 helpers, who all wanted a turn helping make dessert and of course the funnest thing of all, watching the mixer spin...


We creamed the butter and sugar together...


Added 1 egg.. (Tristan cracked his first egg ever, with NO mistakes!!! )


Added vanilla extract...


Lastly, I added the dry ingredients to the mixed wet ingredients, and of course gave everybody another turn at watching the paddle spin. Then I poured the well incorporated mixture in to a greased pie dish...

Then baked in the oven which for us took about 30 minutes...


And after everyone ate all of their dinner the got a to eat their hard work :)


The pie came out great.. but it really was like a cake. soft and moist, didn't even need a drink with it!! We obviously did not have M&Ms on hand so Hayden choose peanut butter chips for the flavor choice! 


The recipe:
M&M Cookie Pie
1cup + 1 tbs  AP Flour
1/4 tsp baking soda
3/4 cup butter softened (I used "light" country spread)
1/2 cup brown sugar
1 egg
1 tsp vanilla extract
1 Texas shaped container of M&M's- OR- 1-ish cup.

Preheat oven to 325*
Cream butter and sugar. Add in egg and extract and blend. The combine flour and baking soda- mix until completely incorporated. Fold in the M&M's. Dump into a greased 9.5" pie pan and bake for 25-30 mins. You know the drill, when a toothpick/ridiculously small pairing knife comes out clean it's donzo.
Cool, cut into cookie pie slices and enjoy!

The Site:
http://soozind.blogspot.com/2012/03/m-cookie-pie.html

By: Susan Dikeman, FYI great blog!! you should check her out!

I hope you enjoy this recipe as much as my family did!

Go get in your kitchen and try something new!

<3 T

Update-ish:
Made this again, followed the recipe (only I forgot the the baking soda, but it was even more fantastic with out it!)


Tuesday, April 9, 2013

Ranch Chuck Roast with carrots and onions

My husband is a beautiful man.. Knowing he would be leaving for Texas for a week he took out some meat for me to cook on my days of from work. One of the fine choices he left for me was a fresh beef chuck roast. I love cooking roast.. why?!?!... 1) cause I can place it in a Crockpot or oven for a long period of time while I get other house stuff done, like laundry.. sigh, 2) there are some many options with veggies to cook with it and what different seasonings you can use fresh or dried. My task this time how do I get 5 kids with different pallets to eat the same meal with out the help of an extra adult in the house. So I perused my spice rack, what spice I have anyways and found an extra packet of Ranch for dressing. That was it!! All of the kiddos like ranch!


I started with a fine piece of meat and a medium yellow onion. I did not use any oil in the pan and I cut the onion into 8 chunks.


Next, I took some organic carrots I had sitting in my tiny fridge (yes our fridge is an "apartment fridge", very tiny) and cut them into "chunks". I had made some beef broth cubes earlier this year so took out 6 cubes and placed them in the pan the sprinkled the ranch packet over the top of everything...


This is the best part.. place the roast in a 325 degree oven and let'er buck.. ha ha! I love my husband and his sayings :). For this particular roast I let it cook in the oven for about 2 hours and it was pulling aways from the bone and nice and tender! So, I started making my side which included baked mac-N-cheese which I made with sharp cheddar cheese this time and broccoli. For the broccoli I steamed it and used some of the extra cheese sauce and poured over the top... Then the roast was perfect...

I know my camera skills were not the best last night..he he but it was the best picture out of all I took. In my defense (I know excuses) I did have 5 kids playing near by and hollering they are STARVING... I swear it is funny how dramatic a 4 and 5 year old can be when it comes to food! :)

This recipe idea I am sure can be applied to other types of meat and roasts.. so you mission, if you choose to accept, find you perfect piece of meat and try it with beef broth and ranch and see what you think. My kiddos LOVE the ranch flavor.. the ate up every bite! Even my 4 and 5 years old who both had tummy troubles that morning!

I call this recipe a SUCCESS!!

Your turn, go create!

<3 T

Saturday, April 6, 2013

Beef Steak Strips in Gravy

Originally this started out as me wanting to try making a version of philly cheese steaks, only to find out the idea was GREAT.. but I did NOT have all the ingredients I needed and going to the store "real quick" just isn't an option now a days. I mean sure I can get a few kids ready to go.. YEAH right!! We are still having to layer anytime we go out side. So, 3 kids (ages 4,5 & 6) getting into snow pants, snow boots, hats gloves and a heavy jacket is no small task much less doing ALL of that just to drive 8 miles into town to the store.. Nah.. NO thanks you I will create :)!

We had some delicious beef round steaks that I cut into strips, green peppers cut into strips and roasted garlic just cut up. In a large skillet I put some olive oil, maybe 1-2 tbsp, and let that heat up then add in the ingredients...


I want to say the strips are abut 1/4 inch thick, for the green peppers I cut the top and bottoms off then sliced into long strips..


Once the oil is hot add in the garlic pieces. Cook them for about 2-3 minutes, or until you can start to smell the garlic...


Next add in the green peppers. I let this cook for about 5 minutes to give the pepper time to start to soften...


Finally add in the beef strips. Sprinkled salt, pepper and a pinch of paprika over the steak and peppers. Cook all of this until the strips are just cooked through (not too done, they still have more cooking to do (; )


Now the next part was pretty darn easy.. :) Once your steak and peppers are cooked take them out of the pan, I placed mine into the bowl they would be served in, and return the skillet to the stove. Using 2 cans (I do believe they are the 14.5 oz cans) of cream of mushroom soup and 1 can of water. Using a whisk combine the soup and water together over medium heat. Once warmed up and combined add back the steak and peppers..


I would love to show you the final plate.. But having all boys (and 1 little meat eating girl) they come in get their food and like a tornado the plates are empty. And poor mommy and daddy they barely have time to sit before helping the kids down :) however, we would not trade it for the world!!

This dish was absolutely fabulous! The taste was so very tasty! No, it did not taste anything like a philly, but it was amazing all on its own! I am pretty sure (haven't experimented yet) a flank steak would work nicely as well.. give it a try see what you think! And as always please feel free to leave feed back about this recipe or what creation you come up with!

Go be creative in YOUR kitchen :)

<3 T

Tuesday, April 2, 2013

Delicious Pie Bars

This adventure actually started cause my ever so cute husband has been craving blueberries for a few weeks now. I had already been on the hunt for a good blueberry recipe. I found blueberries cream cheese bread, but it was wayyyyyy to involved and I wasn't sure I had the patients for all of that. The next thing was a pie, I then went hunting for a pie recipe and found Blueberry Pie Bars. To my surprise the recipe looked super easy. I did make the recipe to a tee the first go round with the blueberry and only added drizzled honey over the top. Then with such rave reviews I was told I most blog about this one. So, back to baking with the camera I went. I did not have any blueberries left, but strawberries I did have! :)

I went to cutting strawberries. I soon found I had more then enough for one pan of bars but not quiet enough for 2 pans. I knew I had some rhubarb (thanks to the amazing sis-in-law) in the freezer, took out about 1 1/2 cups to thaw... Then continued cubing strawberries :)


I swear it was the most perfect spring day this weekend while baking an amazing spring desert <3
Love the way the sun light hit the strawberries and cutting board!


Once I had the strawberries all cut up I then drizzled about 1 1/2 tbsp of honey over the top and 1 1/2 tbps of sugar. I let the mixture sit for about 5-7 minutes to "marry". I took out about 1/2 cup of strawberries and added them with the Rhubarb in a medium sauce pan. I then added about 1/2 cup of water and 1/4 cup of sugar to the pot and brought to a boil...


The smell of this mixture boiling was to amazing for words to describe. I did end up adding about 1 tbsp of honey to the pot too...


I let the strawberry-rhubarb mixture boil down until it reduced to a nice thick/ creamy mix. Once the consistency was where I liked it I turned the heat off and added 1 tsp of Vanilla. This is what I got...


The flavor for me was spot on.. tart yet sweet! 


I set this aside to cool off and started on the crust... flour, sugar, salt and butter... plus a food processor...

You mixed the flour, sugar and salt together until it is mixed. Then add the cold butter, cut into 1/2 inch pieces, into the flour mix. Process until it is well mixed and still crumbly. Set aside 1 1/2 cups of the crumbles to put on the top of the bars. Take the remaining amount and spread, then press into the bottom of a lightly greased 8x8 square dish...


I did 2 batches not a double batch. I did this cause I wanted the amounts to be correct, and not be guessing at what was half of the mix  :)


Once I had both crusts made and pressed I started on the batter. I mixed all the wet ingredients together, egg, sugar, sour cream, flour and vanilla, in a metal mixing bowl and a whisk by hand... (I know supper mom!!)


Then add in the strawberries that have been marrying in the fridge for 30 minutes by this point and so very happy!!


Once you add the fruit in FOLD, not stir, fold the fruit into the batter (which every time I made this the batter was not thick). Then pour the final mix on top of the pressed crust.. like so....


This looks heavenly at this point it was hard to not try it right then and there....


The next step was possibly the easiest (like any of this was hard) Sprinkling the crumb topping over the bars...

Place this in the oven at 350 degrees for 45-55 minutes, or until the center is done. For me this took about 65 minutes.. but with all that time on my hands I had time to ponder how to make this even better. I got it.. and glaze/icing to drizzle over the top...


1/4 Cup of whole milk
8-9 tbsp of powdered sugar
Mix together until you get your desired thickness. I left mine a bit runny so I could drizzle of the tip of a spoon...


Finally.. the bars are done!! time to take them out let them cool, drizzle even more goodness on top.. then EAT!!


I was so hard to not eat every square inch of the bars but, it was dinner time.. so a waiting we went... once dinner and baths were done we finally got to try this.. WOW!! so worth the wait.. I am sure we will make this one again and again and again...


Blueberry


Strawberry


Strawberry-Rhubarb


Now it is your turn to go make these and make them a hit in your home.. TONIGHT!!

Go- Get in there.. don't hesitate this is simple and you CAN make it!!

<3 T